Crepe Myrtle Pruning. Stop Committing ‘Crepe Murder’.

Each winter season, people all over the South start butchering crepe myrtle trees. One guy starts, then other neighbors and landscaping crews follow suit, chopping plants down to stubs. Do these people know what they are doing? Cutting down trees! Are any other trees destined to be cut back so severely and denied their true potential? Why do so many people become serial “Crape Murderers” as this act has come to be called?

Crepe Myrtle

Example of Crepe Murder

Each winter Steve Bender, who writes for Southern Living Magazine, tries to put a stop to the slaughtering and provide education for the proper way to prune a crepe myrtle.

He explains the objectives of pruning a crepe myrtle tree: to help maintain its natural sculptural form, produce strong branches that hold flowers upright, and open up its center to reveal the smooth, multi-toned bark that forms on mature trunks and branches. Usually, instead, the plants end up as stumps or looking like they came out of a Dr. Seuss book—not at all proper for a Southern landscape.

Crepe myrtles like to bloom on new wood, but not all plants need, or get, pruned—and they still bloom beautifully. If a plant MUST be pruned, use these guidelines:

*  Prune in late winter. February is ideal.

*  Remove suckers at the base, crossing or rubbing branches, and branches growing inward toward the center of the plant.

*  As the tree grows, gradually remove all side branches from the main trunks up to a height of 5 feet or so.

*  Cut back to another branch, to just above an outward-facing bud on a branch, or to the branch collar (a swollen area where the branch joins the trunk). Never leave lone or clustered stubs.

*  Try to remove unwanted branches before they get thicker than a pencil.

*  It’s okay, but unnecessary, to cut off old seedheads.

Southerners across the South think that because their neighbor prunes his crepe myrtle, they should, too. Or a homeowner has a landscape company who just prunes the crepe myrtles every year—tell them to STOP COMMITTING CREPE MURDER.

Or maybe the plant has outgrown it’s current location, which just means the wrong variety was planted in the wrong location. The Petite series only gets up to 12 feet tall and there are other varieties that grow into large shrubs.

With proper knowledge and training, crepe myrtles can be trimmed for maximum growth and blooming potential. If a plant is mature enough, it most likely could (and should) be left alone.  If “Crepe Murder ” is happening to your Crepe Myrtle trees, please consult with a true landscaping professional to determine the best method for pruning the Crepe Myrtle trees in your personal landscape and prevent future massacres so that your trees can look like this!


Properly-pruned Crepe Myrtle

Properly-pruned Crepe Myrtles


Winter Pruning

Pruning is done to reduce the size of a plant, change or maintain its shape, change its habit, and promote health. This can all be accomplished to some extent in the winter, and in some cases winter pruning is preferred.


It is generally easier to see what needs doing in the winter, when leaves are usually absent or thinner. When we are pruning for plant health that usually means removing crossing or competing branches, or making deep cuts to increase air flow and light availability to the interior of the plants. The bigger the cut, the more important it is to see what you’re doing. It’s also useful to be able to see everything when we are trying to change the shape or habit, as making a plant wider or narrower frequently involves large cuts.


Perhaps the main reason for winter pruning is that most of the plants energies are stored in the roots at this time. This means that we aren’t robbing the plant of energy when we remove part of the top, which is especially handy when we need to prune extra hard to get an overgrown plant back in scale. We rarely remove more than thirty percent of a plant, but in the winter we can cut some plants all the way to the ground if necessary. A well established plant will often grow back fast enough that the cutback is no longer obvious before the end of the next summer. Hard cutbacks or rejuvination pruning in the summer can sometimes leave the plant struggling for years.


Lastly, springtime is right around the corner. With the spring will come a burst of growth that quickly ‘heals’ the wounds and hides the cuts. Also, we know that the new growth will follow the ‘instructions’ we gave it with our pruning: growing up, or out, or from the bottom, or filling in holes.


Winter pruning is an important part of your overall pruning program. It can let you make adjustments and changes that aren’t possible during the growing season, it can make your work safer, and it can help you ‘get ahead’ before the busy spring growing season.

Turf Diseases Most Common in Atlanta

Control of Landscape Pests and Turf Diseases that cause Lawn Damage 

As the weather turns warmer and more humid, the activity of and damage from landscape pests and turf diseases can become a costly issue for Atlanta-area homeowners, businesses, and parks. Of most concern to most homeowners is damage to lawns from fungus activity. The most common turf diseases that affect our 3 most common types of turf grass are:

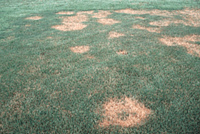
Brown Patch Fungus Turf Diseases

Brown Patch Fungus

  • Fescue Turf – Brown Patch Fungus: This fungus creates brown patches in the lawn, eventually causing grass to die, leaving bare spots.
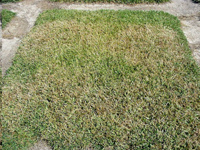
  • Zoysia Turf – Large Patch and Dollar Spot Fungi: Large Patch is the most damaging. As its common name implies, this fungus creates large dead patches in the lawn. Dollar spot gets its name from appearing as large Silver Dollar size spots throughout the lawn. This fungus weakens the thickness of the grass in these spots and looks unsightly.
  • Bermuda Turf – Bermuda is fairly tolerant to most fungus damage but can have an issue with Dollar Spot.

Fungus is a microbe that already exists in our soils.  Whether it becomes an issue in a lawn depends on several variables which include: 1) ability of the turf type to “fight” the fungus or as stated by growers “tolerate” the fungus, 2) the soil temperature that “wakes up” the fungus, 3) the moisture level of the soil surface and grass blades that are sufficient enough to support fungal growth.


Dollar Spot Fungus Turf Diseases

Dollar Spot Fungus

Since fungus microbes are present in our soils, fungus can at best be only “controlled” but not “eradicated.”  This means that lawns which exhibit fungus activity will usually have an issue with fungus every year. The best control is avoid over-watering from irrigation systems, and to apply an appropriate preventative or suppressing fungicide product just before and during the season of fungus activity.


Large Patch Fungus Turf Diseases

Large Patch Fungus

Solterra Maintenance Clients have the option to be placed on a program that will include their property in the schedule for fungicide applications as the timing is appropriate. This program is outside of the standard lawn treatment programs which are setup to control weeds and fertilize lawns.  Therefore, there is an additional charge for the fungicide program and is normally invoiced after each treatment has been applied. The number of treatments needed each year will depend upon the fungus type being treated and the weather conditions for that year. For Large Patch Fungus and Dollar Spot, the number of treatments needed is typically three (3). For Fescue brown patch, the number is typically five (5).


Contact Solterra’s Office or your Account Manager to have your property added for fungicide treatment. 

The photos shown are from the UGA’s College of Agriculture and Environmental Sciences. Read an article about about turf disease here.

Transitioning to Spring Lawn Care

Transitioning from the cold winter months to the spring warmth can be a welcome reprieve for us, but for our lawns it’s one of the most difficult yet most important times. If we want a healthy, green lawn all summer long, what we do from February to April is vital. Here’s a helpful run down of the steps you need to take to ensure your yard is looking great all summer long!


Warm Season Turf    (Bermuda and Zoysia)                                              

What to do?                                                                                                                     When?

Apply PRE-EMERGENT Weed Control.––––––––––––––––––––––––––––––→Mid-February (optimum) to Mid-March

2nd Pre-emergent application with Fertilizer–––––––––––––––––––––––––––→April

Apply Post-emergent Weed Control for Broadleaf Weeds–––––––––––––––––→Anytime when visible

Service lawn EQUIPMENT (mowers, edgers, trimmers)––––––––––––––––––→Early March

SOIL TEST (if desired)––––––––––––––––––––––––––––––––––––––––––––→Early March

DETHATCH small areas with a rake

OR

SCALP large areas with a Mower––––––––––––––––––––––––––––––––––––→Late March-Early April

AERATE compacted soil areas––––––––––––––––––––––––––––––––––––––→April

FERTILIZE with high nitrogen turf fertilizer when grass starts to “green up”––→April

 TOP DRESS with river sand if needed when grass begins to “green up”–––––→April

 Turn on IRRIGATION (when day temperatures in upper 60’s)–––––––––––––→Mid-April


 Cool Season Turf  (Fescue)

What to do?                                                                                                                       When?

Apply PRE-EMERGENT Weed Control–––––––––––––––––––––––––––––––→ Mid-February (optimum) to Mid-March

Apply HIGH NITROGEN Fertilizer––––––––––––––––––––––––––––––––––––––→Mid-February to Mid-March

Apply Post-emergent Weed Control for Broadleaf Weeds–––––––––––––––––––––→Anytime when visible

Service lawn EQUIPMENT (mowers, edgers, trimmers)––––––––––––––––––––––––––→Early March

SOIL TEST (if desired)––––––––––––––––––––––––––––––––––––––––––––––––→Early March

Turn on IRRIGATION (when day temperatures in upper 60’s)–––––––––––––––––→Mid-April

SEED thin spots (regular seeding normally in Fall)––––––––––––––––––––––––––→Feb. to Mid-March


EXAMPLE WEEKLY TIME LINE – BERMUDA

WEEK OF :

FEB. 14           Apply PRE-EMERGENT Weed Control

FEB. 21           Apply Post-emergent Weed Control for Broadleaf Weeds

FEB. 28           Service EQUIPMENT (mowers, edgers, trimmers)

MAR. 7           SOIL TEST (if desired)

APR.  4           DETHATCH small areas with a rake or SCALP large areas with a Mower

                        Scalp over 3 mowings.  This week set mowing height at 2 inches.


APR. 11          SCALP large areas with a Mower

                        Scalp over 3 mowings.  This week set mowing height at 1 ½  inches.

APR. 18          SCALP large areas with a Mower.  This week set mowing height at 1 inch.

                        FERTILIZE with high nitrogen turf fertilizer when grass begins to “green up”

                        TOP DRESS with river sand if needed when grass begins to “green up”

                        Turn on IRRIGATION (when day temperatures in upper 60’s)

APR. 25          Begin MOWING when grass is fully green and grass height reaches 2 ½ inches.


EXAMPLE WEEKLY TIME LINE – ZOYSIA

WEEK OF :

FEB. 14           Apply PRE-EMERGENT Weed Control

FEB. 21           Apply Post-emergent Weed Control for Broadleaf Weeds

FEB. 28           Service EQUIPMENT (mowers, edgers, trimmers)

MAR. 7           SOIL TEST (if desired)

MAR. 14         DETHATCH small areas with a rake or SCALP large areas with a Mower

                        Scalp over 3 mowings.  This week set mowing height at 2 inches.

MAR. 21         SCALP large areas with a Mower

                        Scalp over 3 mowings.  This week set mowing height at 1 ½  inches.

MAR. 28         SCALP large areas with a Mower.  This week set mowing height at 1 inch.

                        FERTILIZE with high nitrogen turf fertilizer when grass begins to “green up”

                        TOP DRESS with river sand if needed when grass begins to “green up”


APR. 11          Turn on IRRIGATION (when day temperatures in upper 60’s)

                        Begin MOWING when grass is fully green and grass height reaches 2 ½ inches.


EXAMPLE WEEKLY TIME LINE – FESCUE

WEEK OF :

FEB. 14          Apply PRE-EMERGENT Weed Control with high nitrogen Fertilizer

                        Avoid pre-emergent where new Fescue seed is applied.

FEB. 21           Apply Post-emergent Weed Control for Broadleaf Weeds

FEB. 28           Service lawn EQUIPMENT (mowers, edgers, trimmers)

MAR. 14         Begin weekly MOWING at 3” height as grass begins to grow more rapidly

APR. 11          Turn on IRRIGATION (when day temperatures in upper 60’s)

Extreme Cold Weather Protection

Extreme Winter Cold Protection for Your Plants

Winter is finally here and with it comes our crazy Atlanta temperatures! Most of your landscape plants will be fine during this period but occasionally with extreme cold like we are having now some plants may show damage.   Right now the most important plants to protect are those that are getting ready to bloom like Camellias and tender plants like some tropicals that are borderline in our planting zone.  Damage will depend on how long the freezing weather lasts and the overall health and tenderness of your plants.  Mulching your landscape is excellent protection for your plants during our extreme cold. 

Plants that can be affected:

Container plants, Camellias with buds, Gardenia, Fatsia, Aucuba, palms and Lantana (perennial).

If your plant is very large then protection will be difficult or impossible.  Concentrate on the manageable plants or only a special plant or two. 

Preventative measures you can take:

Place container plants in a covered area (garage, house or shed )or place a protective covering over them making sure the foliage is not in contact with the cover .  Using stakes will help create a tent like enclosure.  The roots will get freeze damage so wrap the pot with plastic, burlap or plastic.   Placing plants against a wall or other structure will help break the wind.   Small courtyards or semi  enclosed spaces will help protect them too. 

Before it freezes (while the ground is not frozen), water your plants to help protect the roots.  Soil that is well watered will absorb heat and radiate heat.  Plants will weak or shallow roots are more susceptible to injury.  Mulching the roots helps regulate soil temperatures.

Covering your tender plants and plants that are in bud (like Camellias) will create a pocket of air to insulate them.  Ideally the cover should not touch the foliage but sometimes that is very difficult to do.  Make sure the cover also reaches the ground and is secured in case of strong winds. 

Home Depot  is selling lightweight plant covers that come in different  sizes.  They have a drawstring which will help keep them from blowing off.   Other stores and nurseries may be offering similar products.  Call before you run out to get some to make sure they are available.  You can also use sheets, plastic or cardboard boxes.   Black plastic is best  since clear will create a greenhouse and could overheat your plant.   Just remember to secure them with rocks or stakes so they don’t blow off!  Fortunately this freeze will pass through in the next couple of days and we can get back to our normal winter temperatures.  Don’t forget to take your covers off when the weather warms up to above 32 degrees.  Plants need light and will suffer if the cover is left on for longer than 2 days.


Landscape Maintenance

MAINTENANCE GUIDELINES TO ACHIEVE A BEAUTIFUL LANDSCAPE

[Original Title “Maintenance is Key”, Published in Atlanta Home Improvement Magazine – Oct. 2006, 2007, 2008]

Once your landscape is planted, make sure to keep it beautiful

How exciting! You have finally made the investment in the creation of a beautiful landscape or new garden area! Now what? It looks so beautiful, but how do you keep it that way? If you are like most homeowners, you opted for a low-maintenance landscape.  Hopefully it will grow into being low-maintenance; however, initially, it will take more care to get established.

 So what do you do? First you need to be familiar with your new plant materials and their individual care requirements. These include watering, fertilization, pruning, and pest control. If you do not have this knowledge, refer to a good resource such as your landscaper, your county extension service, a reference book, or the Internet. Some landscapers offer consultation services for a small fee. Once you are armed with this information, then you can create your maintenance plan.


Water Well

Water will be the most critical factor in establishing your new landscape. More plants die from either too little or too much water than from other factors. 

  • First, be sure to check for local watering restriction updates on the MALTA Web site, www.maltalandscape.com. Currently, hand watering is allowed for 25 minutes a day on an odd-even scheduled between midnight and 10 a.m. Odd numbered addresses can water Tuesday, Thursday and Sunday, and even numbered on the other days.
  • Early morning is the best time since watering in the evening can invite the growth of fungus.
  • Newly sodded or seeded lawns will require more frequent watering than trees and shrubs. The goal with sod and seed is to keep them continually moist (but not water-logged) for the first 2 weeks, and then can be stepped back to 3 days per week for the remainder of the growing season. Because of this, check on local restrictions before laying down a new lawn.
  • Trees and shrubs require 3 to 8 minutes once to twice daily (depending upon how quickly your soil dries out) for the first two weeks. Be aware that watering times and frequency will vary with the weather.  Less water is required during wetter, cooler months.
  • Pay close attention to each plant to see if it is telling you that it needs more water or less water.  A wilting plant can also mean too much water.  First check the soil 1 inch below the surface at the roots to see if it is wet or dry.  If still very wet, do not apply more water.  The soil may even need to be further amended to help with drainage.


Food for thought

Fertilization is also important in helping plants and grass to survive and thrive. 

  • A time-released type fertilizer should have been applied with the installation.  Some specialized fertilizers exist for certain types of plant materials such as annual flowers and acid-loving shrubs which includes Azaleas. However, a general fertilizer formulation of 10-10-10 can be used with most all plants and grass. If a fertilizer was not applied at installation, apply as soon as possible.
  • Always refer to the fertilizer manufacturer’s recommendation for application on the package. It is possible to damage plants and grass by applying too much fertilizer. It is recommended that grass be fertilized throughout the growing season. Trees and shrubs should be fertilized no less than twice per year.


Growing grass

The highest maintenance plant type is grass, which refers weekly mowing during the growing season. Newly installed sod and seed should not be mowed for two to three weeks following installation. New sod is ready to mow when it is growing and has rooted well (test by lightly tugging on a few sod pieces). New seed is ready when the majority of the seed has grown in and is not pulled out by the mower wheels passing over it. The cutting height will depend upon the type of grass. Ask your landscaper or refer back to a good reference source for the proper mowing height. 


Pruning time

Tree and shrub pruning requirements will be based on the type of plants and their rate of growth. Many evergreen shrubs (such as holly and cleyera) will require frequent pruning and can be pruned during most times of the year. Some flowering shrubs (such as hydrangeas and azaleas) should only be pruned in spring and summer in order to avoid pruning out the flower buds for the next season. Perennial plants can be pruned to the ground when their foliage completely turns brown usually late summer to fall.


Weed trimming

Weeds are a maintenance nightmare. Pre-emergent products exist to aid in decreasing the emergence of weeds from seed. However, it is important to use the proper product since most pre-emergents will also prevent or impede growth of new sod or flowers. Do not apply a pre-emergent on grass seed, since it is meant to prevent seeds from growing.  Common pre-emergents can be applied over well-established lawns and shrubs or mulched beds. 

If weeds are present, a post-emergent can be carefully applied to the weed. Most post–mergents (weed killers) that are commonly bought and used are non-selective, which means that they will kill or damage any plants whose foliage is sprayed. Therefore, be very careful not to spray the leaves of shrubs and trees, or the blades of grass. If weeds are very close to desirable plants, it is best to pull them by hand, taking care to get the roots of the weed. Additional pests are disease and insects. Monitor your plants and consult a good resource to diagnose any problems. Treat any problem as soon as it is detected.  There are also products for prevention of disease and insect damage. As always, be sure to follow the manufacturer’s label for directions as using any product.

Maintaining your newly installed landscape or garden does seem like a lot of work, but it can be accomplished successfully with knowledge, time, and care.  If you are lacking in any of these areas, a professional landscape contractor can help. Being familiar with your landscape materials and maintaining them with proper watering, fertilization, pruning and pest control will bring you joy and pride in your home for many years. So Happy Maintaining!